Two Months ago, I attend 嘉義縣政府 AutoCAD Map 3D and MapGuide 6.5 Training and be the lecturer. I record the AVI for AutoCAD Map 3D 2009 for students reviewing the training.
http://www.youtube.com/watch?v=Q9IcnFnkt8s
http://www.youtube.com/watch?v=FkCJ9Y3X-UI
http://www.youtube.com/watch?v=AH40ErLfRyE
http://www.youtube.com/watch?v=QTtYr8NUUKc
http://www.youtube.com/watch?v=6Phg6PPB_0M
http://www.youtube.com/watch?v=aALjZw6KrPM
2009年11月16日 星期一
利用Map 3D整併Shape File檔案
在很多資料管理單位統整GIS圖檔時,常會需要將不同單位、時間、地點所建立的空間資料,整併為單一的GIS圖資,方便未來的管理與應用。
本篇文章教導如何將兩個以上的Shape File檔案合併為單一的Shape File檔,利用簡單的鄉鎮區界建立範例來展示這樣的操作與觀念。
In the artical, you can learn how to use Map 3D to combine two Shape file into one Shape file.
http://www.youtube.com/watch?v=SIBsFvkxOEw
操作步驟:
資料匯入Data Import
1. 輸入MapImport指令,匯入Shape File檔案。(Typing "Mapimport" in command line for import ESRI Shapefile.)
2. 選擇資料,將資料建立在物件資料內。(Select "Data" and set the properties to be Object Data)
3. 為了避免物件資料的欄位變為多重的狀況,所以將"資料"中的物件資料名稱變更為"TOWN"(Change the Object Data table to "TOWN")
4. 將面建立為封閉的聚合線。(check convert polygon as polyline)
5. 按下確定按鈕即可(click Okay for import)
資料匯出
1. 輸入MapExport指令,匯出Shape File檔案。(Typing "Mapexport" command for export map object)
2. 選擇匯出物件的類型(本範例是面的資料)(Select the object type for export, in this case, choose "Polygon"
3. 選擇輸出的圖層。(Select export layer)
4. 切換至"資料"頁籤,並且加入資料,選擇物件資料。(in "Data"TAB, check Object Data to export Object data as Shape file attribute)
5. 最後到"選項"頁籤,將會出聚合線為多邊形選取,按下匯出即可。
這樣的操作相當簡單,但是可以衍生出很多變化:
1. 匯入時的圖層名稱,就可以讓您作為資料不同別的描述。比如說:匯入的管線資料分高管與中壓管,你就可以在圖層上面重新變更為以管壓為區分的"高壓管"與"中壓管",然後在匯出的時候,於"資料"頁籤中,加入AutoCAD的基本性質"圖層",就可以產生出新的Shape File檔案,具有高低壓欄位的區隔屬性資料了。
2. 這樣的操作也可以用在不同GIS個是資料中,如TAB、E00...所有Map 3D所支援的GIS資料。
3. MapImport與MapExport是最簡單整併方法。
希望這樣的操作可以帶給讀者更多實務的應用想法。
2009年7月23日 星期四
Civil 3D 2010與Map 3D 2010台灣座標系統設定
http://www.youtube.com/watch?v=iKE6fYGw3Ng
協助台灣使用者定義台灣常用座標系統TWD 67與97,本操作適用於Civil 3D 2010與Map 3D 2010版本之操作。
內政部於民國六十九年完成三角點檢測,並公布「中華民國臺灣地區三角點成果表」,其測量原點為位於南投縣埔里鎮虎子山一等三角點,採用二度分帶橫麥卡托投影坐標系統,稱為TWD67坐標系統。相關資料如下:
參考橢球體:採用1967年國際大地測量及地球物理學會(International Union of Geodesy and Geophysics 簡稱IUGG)公布之參考橢球體 (Geodetic Reference System 1967 簡稱GRS67),其橢球參數為:
長半徑: a = 6378160公尺
扁 率: f = 1/298.25
測量原點:虎子山一等三角點
地圖投影:二度分帶橫麥卡托投影
相關網址請見http://www.nlsc.gov.tw/websites/04_knowledge/01_list.aspx?la=1&le=2&li=4&m_sno=30#TWD67坐標系統
--------------------------------------------------------------------------------------------------------------------------------
內政部自民國八十二年起,採用GPS衛星定位測量技術,辦理衛星追蹤站及一、二等衛星控制點測量,並於民國八十七年公布新的國家坐標系統(TWD97),其相關資料如下:
參考框架:採用國際地球參考框架(International Terrestrial Reference Frame ,簡稱ITRF)。ITRF為利用全球測站網之觀測資料成果推算所得之地心坐標系統,其方位採國際時間局(Bureau International de I’Heure 簡稱 BIH)定義在1984.0時刻之方位。
參考橢球體:採用1980年國際大地測量及地球物理學會(IUGG)公布之參考橢球體(GRS80),其橢球參數為:
長半徑: a = 6378137公尺
扁 率: f = 1/298.257222101
地圖投影:二度分帶橫麥卡托投影
相關網址請見http://www.nlsc.gov.tw/websites/04_knowledge/01_list.aspx?la=1&le=2&li=4&m_sno=30#TWD97坐標系統
Map 3D 2010新增功能 - 動態影像座標系統套疊AVI
過去在Map 3D 2009以前,不同座標系統影像要與專案套疊幾乎可以說是不可能的事,使用者必須要遷就影像圖檔的座標系統來設定向量地圖的座標系統。
現在,Map 3D 2010具有動態座標系統套疊的能力,無論你是使用哪一種座標系統的圖資,都可以自由的進行套疊與應用。
http://www.youtube.com/watch?v=KjEtkwnOjfc
本範例,利用TWD67座標系統的台灣SPOT影像,分別與TWD97的台北市及WGS84的世界地圖進行套疊。
現在,Map 3D 2010具有動態座標系統套疊的能力,無論你是使用哪一種座標系統的圖資,都可以自由的進行套疊與應用。
http://www.youtube.com/watch?v=KjEtkwnOjfc
本範例,利用TWD67座標系統的台灣SPOT影像,分別與TWD97的台北市及WGS84的世界地圖進行套疊。
2009年7月20日 星期一


2009年6月15日 星期一
AutoCAD Map 3D on Windows Operation System Issue
Autodesk Map™ 3D 2005
Microsoft Windows XP Professional with Service Pack 1 or later
Microsoft Windows XP Home Edition with Service Pack 1 or later
Windows 2000 with Service Pack 3 or later
Autodesk Map™ 2004
Windows NT® 4.0 with Service Pack 6.0a or later
Windows 2000 with Service Pack 2 or later
Microsoft Windows XP Professional
Microsoft Windows XP Home Edition
Autodesk Map™ 6
Windows 98
Windows Millennium Edition (Me)
Windows NT® 4.0 with Service Pack 6.0 or later
Windows 2000 Professional
Microsoft Windows XP Professional
Autodesk Map™ 5
Windows 98
Windows Millennium Edition (Me)
Windows NT 4.0 with Service Pack 5.0 or later
Windows 2000
Microsoft Windows XP *
* Compatible. See the Technical Solution TS70700 for detailed information.
AutoCAD Map® 2000i Release 4.5
Windows 95
Windows 98
Windows NT 4.0
Windows 2000
AutoCAD Map® 2000 Release 4.0
Windows 95
Windows 98
Windows NT 4.0
AutoCAD Map® 3.0
Windows 95
Windows NT 3.51
Windows NT 4.0
AutoCAD Map™ 2.0
Windows 95
Windows NT 3.51
Windows NT 4.0
AutoCAD 2004 based products are supported on the following operating systems:
Microsoft® Windows NT® 4.0 Service Pack 6 or higher
Microsoft Windows® 2000 Professional
Microsoft Windows XP Professional
Microsoft Windows XP Home
Microsoft Windows XP Tablet Edition
The following operating systems are not supported:
Microsoft Windows 3.x or earlier (including DOS)
Microsoft Windows 95 (all releases)
Microsoft Windows 98 (all releases)
Microsoft Windows Millennium Edition (ME) (all releases)
Microsoft Windows NT Server Platforms (all releases)
Microsoft Windows 2000 Server, Advanced Server, and Datacenter Server
Microsoft Windows XP Media Center
Microsoft PocketPC (all releases)
Palm™ OS (all releases)
IBM® OSX (all releases)
Linux/Unix-based operating systems (all releases)
Apple Macintosh® Operating System (all releases)
Sun Microsystems Solaris™ (all releases)
Virtual Operating Systems running on any platform
Any other operating system not explicitly listed as supported
AutoCAD Map 3D 2010開啟DTED地形資料
AutoCAD Map 3D 可以開啟的檔案格式相當的多,包含不同種類的向量式資料與網格式資料。
詳細資料列表如下:
網格式(JPEG、JPG2K、MrSID®、TIFF、ECW、DEM、ESRI Grid、DTED 與 NITF )
向量式(DWG、Arc/Info® Coverage、ESRI 的 SHP 與 E00、MapInfo MIF/MID™、MapInfo TAB、MicroStation® DGN (V7 和 V8)、通用標記語言 (GML 3.1.1)、Ordnance Survey MasterMap (DNF) (GML2,唯讀)、Vector Product Format(VPF,唯讀)、Autodesk SDF 及空間資料轉換標準 (SDTS,唯讀)
利用資料連結技術(FDO)與FME幾乎就可以處理常用的GIS資料。本篇文章將介紹AutoCAD Map 3D 2010開啟DTED的資料格式,並展示2D與3D。
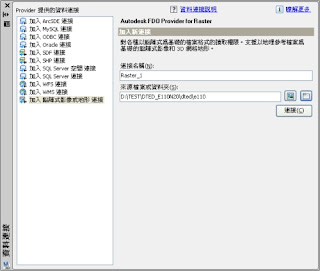
資料連結
1. 開啟AutoCAD Map 3D後,由右方的"工作窗格"點選"資料連結"的按鍵。系統會自動開啟"資料連結"對話方塊。
2. 選擇"加入點陣式影像或地形連結",並且由右方的"資料夾"中選擇資料的目錄。最後按下"連接"。
3. 於連接後,系統會顯示該資料夾下AutoCAD Map 3D可以連結開啟的影像資料格式的所有檔案。
4. 使用者可以勾選要加入的影像資料或地形資料,並且設定是否要合併為單一圖層。
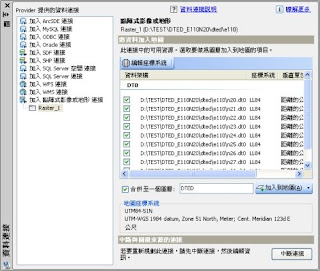
5. 最後,按下"加入圖層",系統會自動於繪圖區內顯示資料。

變更主題顯示
1. 預設的DTED影像會用綠色的顏色顯示,使用者可以點擊"工作窗格"兩下,開啟"形式編輯器"變更顯示的樣式與主題。
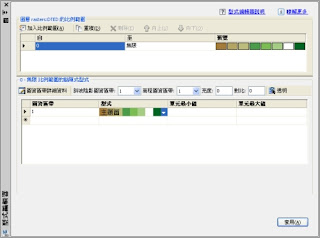
2. 點選"形式編輯器"中的"形式",並且由下拉式選單選擇"主題圖",系統會自動開啟"主題圖"的編輯器。
說明:由於DTED資料是數位高程的資料,所以在主題規則上會是以高度顯示,使用者可以用"指定主題圖"中的"色盤"選擇所要應用的顏色。最後按下"確定"。
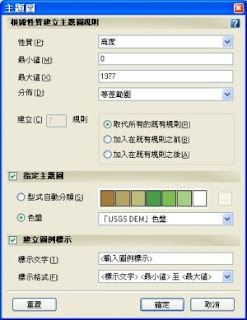
3. 再回到"形式編輯器"中按下"套用"。
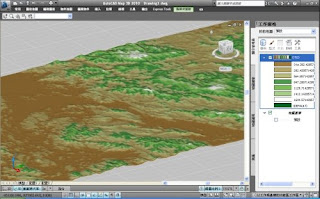
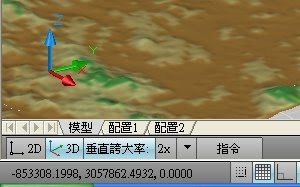
2D與3D切換
使用者可以用左下方狀態列上的"切換到2D模式"或"切換到3D模式"作2D與3D的切換。
詳細資料列表如下:
網格式(JPEG、JPG2K、MrSID®、TIFF、ECW、DEM、ESRI Grid、DTED 與 NITF )
向量式(DWG、Arc/Info® Coverage、ESRI 的 SHP 與 E00、MapInfo MIF/MID™、MapInfo TAB、MicroStation® DGN (V7 和 V8)、通用標記語言 (GML 3.1.1)、Ordnance Survey MasterMap (DNF) (GML2,唯讀)、Vector Product Format(VPF,唯讀)、Autodesk SDF 及空間資料轉換標準 (SDTS,唯讀)
利用資料連結技術(FDO)與FME幾乎就可以處理常用的GIS資料。本篇文章將介紹AutoCAD Map 3D 2010開啟DTED的資料格式,並展示2D與3D。
資料連結
1. 開啟AutoCAD Map 3D後,由右方的"工作窗格"點選"資料連結"的按鍵。系統會自動開啟"資料連結"對話方塊。
2. 選擇"加入點陣式影像或地形連結",並且由右方的"資料夾"中選擇資料的目錄。最後按下"連接"。

3. 於連接後,系統會顯示該資料夾下AutoCAD Map 3D可以連結開啟的影像資料格式的所有檔案。
4. 使用者可以勾選要加入的影像資料或地形資料,並且設定是否要合併為單一圖層。

5. 最後,按下"加入圖層",系統會自動於繪圖區內顯示資料。

變更主題顯示
1. 預設的DTED影像會用綠色的顏色顯示,使用者可以點擊"工作窗格"兩下,開啟"形式編輯器"變更顯示的樣式與主題。

2. 點選"形式編輯器"中的"形式",並且由下拉式選單選擇"主題圖",系統會自動開啟"主題圖"的編輯器。
說明:由於DTED資料是數位高程的資料,所以在主題規則上會是以高度顯示,使用者可以用"指定主題圖"中的"色盤"選擇所要應用的顏色。最後按下"確定"。

3. 再回到"形式編輯器"中按下"套用"。

2D與3D切換
使用者可以用左下方狀態列上的"切換到2D模式"或"切換到3D模式"作2D與3D的切換。

2009年4月14日 星期二
Civil 3D & Map 3D Software Learning(軟體介紹/教學)
本部落提供Civil 3D與Map 3D技術討論與教學,並提供台灣、香港、中國地區中、小型專案外包服務。
This Blog provid Civil 3D and Map 3D technical support and learning. Besides, we also provide service for Taiwan, Hong Kong, and China customers to finish project.
This Blog provid Civil 3D and Map 3D technical support and learning. Besides, we also provide service for Taiwan, Hong Kong, and China customers to finish project.
訂閱:
文章 (Atom)